|
Skew Project #1 - Submarine
|
This article appeared in the February 2000 issue of More
Woodturning and is the first of a series that will be appearing there
(and subsequently here).
I hope you find it helpful in mastering the skew which is a very handy
tool once you get a feel for it...
|
|
Legend has it that Rude Osolnik was once asked how to master woodturning.
He replied "Stand in front of the lathe". It seems like pretty basic
advice, however when it comes to mastering the skew that pearl of wisdom
is too soon forgotten. Perhaps it's because most folks are able to
produce a reasonably functional product in fairly short order using other
tools. Somehow they think they ought to be able to become proficient
with a skew without much effort also. At any rate, it seems by far
the most troublesome tool to most beginners.
Taking Rude's advice, this series of articles will present a number
of simple projects that will help increase the skew users comfort level
and proficiency. I've found, for myself at least, that I'm more prone
to make something than I am to simply practice cutting. These projects
aren't fancy; they're offered simply as an excuse to "stand in front of
the lathe" and still create a usable object. The goal is to achieve the
ability to take a billet of wood, and work it from start to finish primarily
using a skew without breaking into a sweat, or "white-knuckling" the tool.
Once the dynamics of cutting with a skew are understood and adhered to,
a turner should be able to attack the wood almost absent-mindedly.
The first thing to do is to become adept at using a spindle gouge. After
all, a spindle gouge is pretty much just a bent skew! You can call
it a "safety skew" if you like. The reason I say to become proficient
with the gouge, is because the tools essentially cut the same. Because
of its shape, the gouge has less tendency to dig in, however it really
isn't that different from a skew. Consequently, if you can properly
cut using a spindle gouge, you're already 75% of the way to
being comfortable with a skew.
To begin, we'll review how a tool cuts. There are essentially
three cuts which a woodturner makes: a shear, a scrape, and a peeling cut.
I'm not convinced that the peeling cut isn't just a greedy shear cut, but
we'll leave that for philosophers to decide. We will use peeling
cuts during our projects, but primarily we'll focus on shear cutting.
A scrape cut is best left to scrapers, so we'll ignore that altogether.
Now, to make a nice clean shear cut a couple of things have to happen.
First, the tool must be sharp, and it must be free of secondary bevels.
The bevel must be rubbing at all times; if the edge has a secondary bevel
or is rounded over the cutting edge will not be presented to the wood.
I'll leave achieving a good edge to an article on sharpening and assume
that your tool is already up to the job. Second, the cutting should
take place on the lower half of the tool. This is easy with a gouge
(er, safety skew), because each wing tapers back - the tool almost forces
you to use the lower wing. If we now flatten out the gouge, and extend
the upper wing, we're pretty clost to having a skew!
There is an important difference however between the skew and gouge;
the fulcrum point on the gouge moves as the tool is rolled in one direction
or another because it has a rounded bottom. The fulcrum point on
the skew is always the lower corner of the tool. The closer the cut
is to this edge, the more stable the skew. Cutting on the lower half
of the tool can be compared to packing the heavy items in the bottom of
a canoe, you're essentially lowering the "center of gravity". Of
course, gravity doesn't really have anything to do with turning, but it's
a useful analogy. It's easier to push a skew over by applying pressure
to the top of the tool than the bottom, thus it is more stable if the cutting
happens on the lower part. This is one of the reasons that the gouge
is so much easier to learn - the shape of the tool almost dictates proper
form.
As long as you keep the bevel rubbing, and cut on the lower half of
the edge, the tool should not catch. The toe of the skew will be
off the wood where it can't dig in. It is very important to be cognizant
of where the skew is cutting at all times. As the diameter of the spindle
decreases, the natural tendency is to lift the handle to lower the tip,
however this causes the cutting point to move up. It isn't long before
the tool is cutting on the upper half of the edge, and pretty soon it digs
in. The better technique is to push the tool inward, towards the
work. This will keep the cutting action in the proper place on the
skew. When I say "push" I simply mean to advance it into the cut.
You don't want to be pushing into the wood - let the tool do the cutting.
Your job is simply to keep up with the waste removal. Pushing too
hard at best results in chatter, or tearout. If you're unlucky, worse
things happen.
With those basics covered, we'll start with our first project, a toy
submarine. Probably the easiest cut to make is a simple planing cut,
which will both remove the waste material, and give us a smooth cylinder.
From there, we'll taper the back end and gently roll the cut to round
over the nose.
Find a piece of good scrap between 12" to 18" long, and 3 inches wide
or so, and mount it between centers. It doesn't have to be really
fancy wood, but it should be sound. Be sure to set your lathe speed
appropriately before starting. We'll begin by roughing the wood down
to a cylinder. I prefer to use a 3/4" skew for almost all my work,
however if there is a lot of initial roughing to be done a larger
skew will make quick work of it. The added mass of the larger tool
helps stability. A number of turners recommend a ½" skew for
beginners, however I've always found that with the reduced cutting area
and lower mass I don't have as much control unless I'm doing fine detail
work. I suggest that different sizes be tried, and the one that "feels
right" be used.
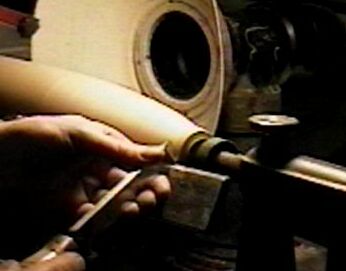
 It
can be rather intimidating initially to try to flatten a piece of wood
when the tool is hopping up and down, but take small bites and it should
go well. I prefer to start with the long point up. The tool
rest should be a bit above centerline, and the tool held so that the cutting
edge is a bit off of 90 degrees (see above photo). When holding a
tool, I like to use what has been referred to as the "four point suspension
system". Point one is the bevel contacting the wood, two the tool
contacting the rest, point three the lower hand (the right hand for most
of us), and finally the heel of the tool handle tucked into the hip or
torso. Keeping the handle tucked into the body adds a tremendous
about of stability. Of course, this will increase control when using
any tool - not just a skew.
It
can be rather intimidating initially to try to flatten a piece of wood
when the tool is hopping up and down, but take small bites and it should
go well. I prefer to start with the long point up. The tool
rest should be a bit above centerline, and the tool held so that the cutting
edge is a bit off of 90 degrees (see above photo). When holding a
tool, I like to use what has been referred to as the "four point suspension
system". Point one is the bevel contacting the wood, two the tool
contacting the rest, point three the lower hand (the right hand for most
of us), and finally the heel of the tool handle tucked into the hip or
torso. Keeping the handle tucked into the body adds a tremendous
about of stability. Of course, this will increase control when using
any tool - not just a skew.
As you cut, move your whole body - not just your hands. Make sure
that your feet are placed such that as you move with the cut you don't
get off balance.
 Start
the cut an inch or so from one end of the wood, and cut toward the edge.
Make the next cut inwards from where you started the last one, and again
cut out to the edge. Don't try to take off too much or the wood will
splinter. Each pass will take off a bit more, until the corners are
all knocked off the billet. In all likelihood, the surface won't
be flat and uniform over it's length, but it should be fairly close.
To clean it up, start at one end taking a very light cut across the length
of the cylinder. I like to hold my left index finger against the
toolrest as I cut, using it as a guide.
Start
the cut an inch or so from one end of the wood, and cut toward the edge.
Make the next cut inwards from where you started the last one, and again
cut out to the edge. Don't try to take off too much or the wood will
splinter. Each pass will take off a bit more, until the corners are
all knocked off the billet. In all likelihood, the surface won't
be flat and uniform over it's length, but it should be fairly close.
To clean it up, start at one end taking a very light cut across the length
of the cylinder. I like to hold my left index finger against the
toolrest as I cut, using it as a guide.
Now that the billet is pretty much even over it's length, take your
skew and make a peeling cut on the left end about 3/4" wide. To do
so, set it on it's side on the toolrest with the long point away from the
headstock, and slowly lower the tip until the edge begins to peel away
the wood. Take the wood down to about 3/4" - be careful not to cut
into your drive center!
Next, we need to begin tapering the tailend. Start at the right
end, and take a small slice off, rolling the tool slightly. We want
to make a gradual convex curve over about 3/5 of the billet. Continue
taking planing cuts, until the desired shape is reached. Don't try
to take off too much at a time - just keep the cut nice and even over it's
length.

Now we need to round the nose of the submarine. In essence, we're making
the left side of a large bead. As you did before, start a little
from the end and cut toward the edge. Take a little off, the back
up a bit and take another cut. While cutting, rotate the tool slightly
counter-clockwise so that the resulting cut is rounded just a bit.
At the same time, you need to lift the handle to bring the cutting edge
down as you near the center line. This is where most catches will
occur because, as noted above, if the tip is lowered the contact point
between the edge and the wood moves up. It is very important that
the tool be pushed forward at the same time to keep the contact point in
roughly the same place.
There are two schools of thought on where the cutting point ought to
be. Some turners like to cut with the heel of the skew, and others
the lower edge. When learning, it's not a bad practice to cut with
the heel. One consequence however is that the cut will produce a
ring of fuzzy wood fibers which will slightly obscure the edge. As
long as the fibers are being produced however, the heel of the skew is
cutting, reducing the chances of getting a catch. To keep cutting
with the heel, both critical actions must be occuring: the tool handle
is being lifted, and the tool is being advanced forward. Once the
ability to maintain a cut on the heel is masted, a turner pretty much has
the mastery to cut in one place on the edge of the skew as well.
As you reach about the half way point cutting the nose of the submarine,
turn the skew over so that the long point is down, and complete the cut
with the toe of the skew. You'll find that it is easier to control
the skew as it approaches vertical if the toe is down and cutting rather
than the heel.

Now that the basic shape is done, stop the lathe and lock the spindle.
Grab a block plane, and begin to flatten a section from about 2/5 to 3/5
of the sub. This will be the "deck" upon which we glue the conning
tower. After it is flat, start the lathe again and clean up the ends.

To do this, I like to cut away the wood by the drive and live centers,
so that only a small bit is left for the center. This can be pared
off with a chisel after removal from the lathe, and cleaned up with a bit
of sandpaper. Then, set the toolrest a bit lower, and cut the endgrain
with the toe of the skew. Important: align the bevel on the side
of the skew that is contacting the wood perpendicular to the axis.
The tool will cut a line parallel to the bevel, not the shank. This
is a fundamental rule to remember! Tilt the skew a couple of degrees
away from the wood, and let the skew slice into the end of the wood, leaving
a nice clean surface.
Now all that's left to do is to cut out a more or less teardroped shape
on the bandsaw, and glue it on, then apply a
good coat of poly for some basic "waterproofing".
| The (almost) finished product. |
A couple of satisfied customers! |
 |
 |
Last updated: March 13, 2001