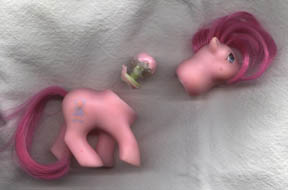
Peek-a-boo head removal.....
These are the directions for removing
a peek-a-boo baby pony head and still being able to keep the socket
intact.
I took them direct from a conversation I had with Baby Gloomy
one of the best customizers around today. She has been making
MLP customs for about a year now and sells them on ebay.
I can't guarantee that you won't have problems doing this. We tried to be as through as possible to help you all be able to do this technique. Please read all of the directions first and as always try it on a pony you don't care to much for or have multiples of.
If you need more help feel free to contact me by email or by finding me online on Yahoo Instant Messenger ID <sailaway_99507> I would be happy to help you if I can.
She and I will be adding photos of the inside socket soon so you can see better how it looks when apart.
Good Luck!
Sail-Away~
OK. So you want to remove the head form your peek-a-boo and do the tail rust or some rethreading? Well, first off it takes a little luck but, if you follow these directions you will have a much better chance.....
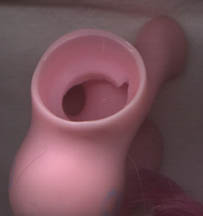
It is easiest to start with the bottom portion. Meaning the body section. Feel around the out side of the pony. Around each section you will feel a hard plastic piece. Those are the parts you have to remove.
The peek-a-boo works with a ball and socket joint. The hard part in the neck is the socket. There is a smaller rod with a ball like thing on the top that sticks up into the head portion. You aren't trying to split the two pieces just remove it from both sides. Inside the neck is this flat portion that is what you have to remove there
Grab the head part firmly and kind of push the head to one side just enough to see in the joint.BE CAREFUL YOU DON'T WANT TO RISK BREAKING THE JOINT! You have to bend it without putting to much stress on the rod inside.
Now take an exacto blade and make a tiny incision about 1/2 cm or so to start. Just enough to pull the base away from the plastic. I had to cut all the way around the flat portion in there. But if you do you need to cut VERY close to the socket portion. Most times once you have an incision made you can use a screwdriver to pop out the flat portion with a little work. Just over the little lip on the inside.
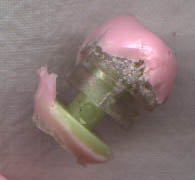
NOW for the tough part.....removing the Ball joint from the head......
The plastic holding the ball joint<the clear plastic as seen above> is the most fragile!
You follow the same basic procedure here too. The clear plastic part is like two cups sliced vertically so if the ball inside moves it also moves the plastic around a bit too. So try to keep the ball and socket from moving while you remove the parts from the head.You will need something slimmer then a flat head screwdriver to get in and pry the ball out. At one point I did have to resort to cutting at it. it helps if you squeeze the head just above the ball to try and squish it out. Of course it won't without help from something prying at the bottom. Just remember the clear plastic is VERY FRAGILE and can break REALLY easy with to much pressure.
This part is pretty easy. All you do is pop the ball back in the head and then push the flat part back in the body. If it doesn't hold well add a little super glue to the flat part. But be sure not to get it on the other parts of the head or joint or the head wont move! then all the work you have done will be lost!
This entire procedure took about 15 minutes to do on my first try. You will need an exactor blade, glue,flat screwdriver,and tweezers or something small,thin,and flat. Please be careful and not ruin your pony.
 |
|
|||
|
|
|
|
|
|
|
|
|
|
|
|