 Re-Pairing a Brush 'n' Grow Pony
These instructions are to
help you repair the brush and grow mechanism. If you do somehting
wrong I can't be responsible. I did make the repair on MY pony
and it worked but it might be a different problem with yours.
Please be careful.
If the head doesn't rachet
after you have seated the thimble properly then the plastic ratchet
system has just worn down.
 Step
ONE: Know your pony.....
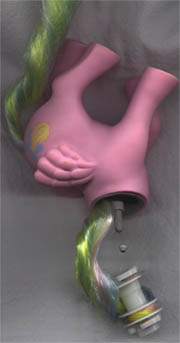
Inside the pony is made
of a few parts.
Step
ONE: Know your pony.....
Inside the pony is made
of a few parts.
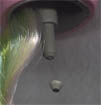
First there is a post inside
the body. On the top of that post there is that little Bead of
plastic. Normally they are attached to one another.That little
bead is inside the head portion.when the pony is fully assembled
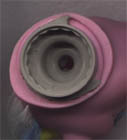
Second there is this Thimble.
It clicks into place inside of the pony. if that isn't ckicked
in then the head and tail won't ratchet the hair up. That si normally
the problem. That little thinble becomes loose just a millimeter
or so and then the pont wont work anymore.
Well, the thinble is clicked
into place and then inside the head there is another Piece that
acts as the ratchet. We will get to that later.
Step Two: Pop that little
head right off....
You have to break that bead
off of the top of the post. I was pulling to hard to figure out
how to disassemle the pony and the bugger broke right off and
rattled inside the ponies head. I just pushed a little to the
side and upwards towards the head and the thing snaped. I was
then free to reset the thimble and go about putting her back together.
 Step Three: Ok so getting
her back together. That means cutting her appart....
Here at the head you need
to get that stupid little bead out. that means cutting around
the head socket to remove the rachet part. You will need a VERY
sharp blade. At the sides where the two hook-y bobbers are the
skin of the pony is shallow. And vutting to wide will damage the
outer layers and be visible. Once you have removed the rachet
and gotten the bead out then you can either just place the rachet
back in or glue it in. Now before you go to the next step make
sure the head and tail work before going any farther. You can
stop here and not put the bead back on or you can glue it back
together. If the head doesn't rachet after you have seated the
thimble properly then the plastic ratchet system has just worn
down.
Step Three: Ok so getting
her back together. That means cutting her appart....
Here at the head you need
to get that stupid little bead out. that means cutting around
the head socket to remove the rachet part. You will need a VERY
sharp blade. At the sides where the two hook-y bobbers are the
skin of the pony is shallow. And vutting to wide will damage the
outer layers and be visible. Once you have removed the rachet
and gotten the bead out then you can either just place the rachet
back in or glue it in. Now before you go to the next step make
sure the head and tail work before going any farther. You can
stop here and not put the bead back on or you can glue it back
together. If the head doesn't rachet after you have seated the
thimble properly then the plastic ratchet system has just worn
down.
 Step Four: Put that dumb
little bead back on....
You will need EPOXY gue
here. Super glur is to fragile to hold the bond you need.
Glue that little bead back
on and let it dry for a few DAYS. Make sure it is really dry.
This is the only stupid little thing keeping the head on.
Step Five: Put her together...
Ok so you have everything
in place. Now put the thinble in. Make sure it clicks when you
get it in there. if it doesn't you don't have it seated right.
You must get it right in there. Now pop the head back on the post.
Your mechanism has a great cance of working now.
there you go......hope it
helps....
Step Four: Put that dumb
little bead back on....
You will need EPOXY gue
here. Super glur is to fragile to hold the bond you need.
Glue that little bead back
on and let it dry for a few DAYS. Make sure it is really dry.
This is the only stupid little thing keeping the head on.
Step Five: Put her together...
Ok so you have everything
in place. Now put the thinble in. Make sure it clicks when you
get it in there. if it doesn't you don't have it seated right.
You must get it right in there. Now pop the head back on the post.
Your mechanism has a great cance of working now.
there you go......hope it
helps....
