How to use Smokeless Powders
in place of
Black Powder for rocketry ejection
charges.
An R&D project by
Scott Aleckson
Posted May 21, 2001
As A
DRAFT REPORT
Best viewed at 800x600 or larger monitor setting.
Updates will be periodically posted to this page and noted at the bottom!
First Question... Why Bother?
At least a couple times a month the question pops up on RMR (rec.models.rockets), "Where do I get Black Powder?", or perhaps it's something along the lines of, "The guy at the gun shop won't sell me any 4Fg BP because I'm going to use it in a rocket". I personally have access to enough Black Powder to keep me covered on ejection charges for a lifetime, but many others don't and the problem seems to be spreading. A one pound can of BP will provide roughly 450 ejection charges of 1 gm each. So, if you can get your hands on a pound or two, you'll be set for years. For the rest, we need another choice. Restrictions on BP sales, usage, and storage requirements seem to be getting tighter every day. Never mind the fact that BP really isn't a very dangerous product. It would take a really stupid terrorist to make his bomb out of BP when there are so many other explosives that are much more effective and easier to get. But, since we can't seem to get people with common sense into government positions, we'll just have to make other plans on how to get a parachute out of a toy rocket so that it doesn't fall out of the sky ballistic and injure someone.
A little background might be useful here.
I've been into shooting sports my whole life. Even as a small child
I was exposed to my father's gunsmithing abilities while he spent countless
hours in the garage building BP firearms from scratch. A large group
of his friends used to go out and shoot on a weekly basis, and I usually
tagged along. He also reloaded all his own ammunition. I still
have scars from hot lead burns on my left hand dating back to when I tried
to help him mold lead round balls for the muzzle loaders. These days,
I have my own guns and reload my own ammunition. I'm also a shooting
sports instructor for the local 4-H clubs and try to teach this generation
of kids the same gun safety lessons that I learned as a child. So,
with my knowledge of the various gun powders and firearm designs coupled
with my love of science and engineering, I set out to find a way to make
modern Smokeless Powders work in the same capacity that we've been using
Black Powder for in model, mid, and high power rocketry. The good
news is that I found a way to make it work.
About Smokeless Powders
The first thing is to look at is how Smokeless Powders work and how they are different from Black Powder. In a modern firearm cartridge, the SP is usually loose inside the cartridge. In BP firearms, we tightly compact the powder behind the bullet by basically hammering it in there with the ram rod. When the SP cartridge is fired, the primer violently ignites the powder which starts to burn and produce huge amounts of gas. Since the bullet is tightly crimped or pressed into the cartridge, it doesn't start to move right away and the pressure inside the cartridge builds to very high levels. Once the pressure gets high enough, the SP's burn rate rises dramatically pushing it into the explosive range. The majority of the solids in the SP are completely consumed in this process leaving little residue and producing very little visible smoke. On the other hand, BP has a fairly constant burn rate regardless of pressure. When the BP gun is fired, the charge explodes, producing lots of hot gasses and plenty of smoke. There is a lot of residue from the burning of BP and many shooters have to stop and clean the barrel of a BP firearm after only a few shots. This residue is also very corrosive and can eat away the inside of a barrel if it is put away dirty for a long period of time. Unconfined BP will burn at nearly the same rate as it does inside the gun, which is very fast. After all, it is considered a low explosive. However, if you take the SP charge and light it in the open, it burns at about the same speed as tissue paper. You'll see a very large and impressive looking orange flame and there will be some smoke production. When it's all burned up, you'll see a gooey yellow residue left over. Both the smoke and the residue are indications that the SP wasn't burned under high pressure as it was intended. Now if you look inside the fired brass case of a pistol cartridge, you'll only see a very light coating of a black carbon dust and none of that gooey yellow stuff. That means the SP was burned at the proper pressures and it was completely consumed.
Most SPs are made of Nitrocellulose with a binder of rosin and polyester. Some also have some Nitroglycerin in them. These are often called double base powders and have some of the highest burn rates. A huge factor in the burn rate of an SP is the shape and size of the powder grains. Generally, the smaller the grain size the faster the powder burns. Most pistol powders are smaller grains, while the large bore rifle powders tend to be larger grains. In a rocket, we will be propelling a rather light mass and we want it to happen as quickly as possible. We also have a lot of compartment volume to pressurize. For this reason, I focused my efforts on the fastest powders listed. There are a lot of different SPs out there from many manufacturers. To choose which ones to use, I wandered through my reloading manual and noted which powders where used most often in the small pistol calibers. The winners were Bullseye, AA #2, Win 231, Red Dot, 700X, Win WST, Green Dot, AA #5, and Unique; listed in order of burn rate from fastest to slowest. There are a number of other powders with similar burn rates, but since they are seldom used in reloading, I did not consider them. I figure if you're going to pick a powder, pick one that has the greatest chance of being used in both rocketry and reloading. This will insure that it is available to all and you'll be able to pick it up at the local gun shop or Wal-Mart store. An $18 can of powder would last you years if you only used it for rocketry, so you might as well be able to load up some .357's between flying days, right?
I've been favoring Bullseye powder from day one in this project. It is a double base powder (nitrocellulose and nitroglycerin) and has the fastest burn rate on the SP market. It is also used in a lot of popular handgun loads. My runner up would probably go to Red Dot. The burn rate is only 6% slower than Bullseye, so it's still a very fast powder. Red Dot has even more versatility in reloading since it is not only used in many pistol loads, but is also a very popular shotgun powder. I didn't really test either of the AA powders or the 700X, but I'm sure they will do the same job. I don't use them in reloading ammo and I wasn't going to go buy them just for this test. But it's just a matter of figuring out how much to use and they would do the job. I didn't really like the Winchester powders (231 and WST) because they tend to have a lot of static that causes them to stick to the sides of my plastic funnels. I didn't try Green Dot, but Unique got several tests and it worked just fine. Just for comparison, I tried some Blue Dot and some IMR4831, which are both at the slow end of the scale. They produced a lot more residue and failed to consistently produce the required pressures.
Now, the key to using a SP is to burn it under pressure. Not a problem in a firearm, but a big problem inside a rocket's airframe tube. BP burns so fast, that we can put a gram in a plastic baggie with an igniter in it and make the gasses needed to deploy the recovery system. If we tried to do the same thing with SP, you wouldn't get enough pressure. And SP has a lot more potential energy than BP could even dream of. So, why won't it work in a standard ejection charge package? Take a look at the following animated graphic to see what happens. In short, the first few grains of SP will create enough pressure to break the bag or whatever type of holder you normally use. They will also have enough pressure to send the rest of the powder charge flying out into the airframe where it will never be ignited. Smokeless Powder needs stronger containment. Now, how can we do that? I'll show you shortly.
What about Pyrodex?
So, you're next question is, "a guy on RMR
said you can use Pyrodex, and so does a certain rocket manufacturer, so
why can't I just use that in place of BP?" Pyrodex is a smokeless
powder, however it has a relatively slow burn rate, like a rifle powder.
Pyrodex is made as a direct BP replacement for firearms, but it burns nothing
like BP. SP's are measured by weight and BP is measured by volume.
It takes only a fraction of the volume in SP to give you the power of a
BP charge. It would take so little SP that ignition would be a real
problem. If you replaced BP volume for volume with SP, then you would
have an extreme over pressure situation that could turn a muzzle loading
rifle into a pipe bomb. Pyrodex is "diluted" so that you can use
the same volume measurement that you would with BP. That volume measurement
only holds true inside the high pressure environment of a firearm.
When unconfined, Pyrodex just won't produce the needed pressures or burn
fast enough. In this case the larger volume works against you and
you won't be able to burn all the powder before containment is breached.
So, if you're going to use SP, then let's use the right ones for the job
and forget about using Pyrodex.
Pressure Testing
In order to find out how much SP to use, I
needed to see how much pressure it made inside an airframe tube.
This required the construction of a test chamber that I could use to measure
pressure. Using the Keep It Simple philosophy, I took a piece of
2" pipe about 15" long and put a reducer on one end and a cap on the other.
I drilled the center of the cap and put in a 1/4" NPT, then hooked up a
stainless tube going to the pressure gauge and a pressure relief valve.
The end with the reducer was fitted with a custom made plug that has two
wires running through it to hook up the ejection charges to my launch control
circuit for firing them. This gave me easy access to change the charges
allowing me to fire several tests back to back without a lot of setup time.
I also put a tab on the pipe to hold it in a bench vise during the tests.
Following is a picture and a diagram of the test chamber that I used.
It was set up with two gauges, one high pressure and one low pressure,
separated by a valve. This was so I could see the peak pressure reading
on the high gauge, then once the pressure stabilized I could open the valve
and see the low pressure end. Then the pressure could be dumped with
the end valve.

Since BP is the standard, a baseline needed to be established using BP charges. I made up a number of BP charges in 1/2 and 1 gm sizes. The test chamber has a volume of about 50 cubic inches. According to one online BP calculator, a 1/2 gm charge should give me about 20 psi. So, I fired a few 1/2 gm charges to see how it would work. I found that the high pressure gauge would spike to a peak reading almost instantly, then it would fall back very quickly. This peak seems to be about 10 to 20 psi higher than the online calculators say it should be. Due to the nature of a mechanical pressure gauge, the accuracy of reading the pressures produced by these charges is quite poor. The pressure spikes so quickly that the needle will move higher than the actual pressure before swinging back down. By that time, the pressure is already dropping as the gasses cool off. So, without more advanced (and expensive) equipment, I can only guesstimate trends in the pressures produced by various charges. If money were no object, I would hook up an electronic pressure sensor that could record the pressure change over time so that it could also be plotted out for analysis. With that data, one could come up with an equation for computing the needed SP to use in a particular volume airframe. But for now, I'm just trying to make it work, so I live with the approximate trends by watching for the high pressure end of the spike.
After several baseline tests, I found that 1/2 gm would give me a 30 psi spike followed by a 2 psi stabilized pressure and 1 gm would go to 60 psi and stabilize at 4.5 psi. Just for reference, I'm using 3Fg (FFFg) BP for these tests and I measured the charges by grain weight (~15.4 gr. = 1 gm). Although a lot of people say you should use 4Fg BP for ejection charges, in reality it makes absolutely no difference. You could use 2Fg or even Fg powder and it would still work fine in an ejection charge. The advantage of 3Fg is that it is the most commonly used grain size, so it is generally easier to find. The 4Fg powder has but one practical use and that is for the flash pan on a flintlock. The smaller grain size is easier to ignite with the small sparks produced by the flint mechanism and they are also small enough to fill up the flash hole going into the breach of the gun. The igniters we use to fire ejection charges will reliably ignite any form of BP or SP, so the grain size of the BP is irrelevant.
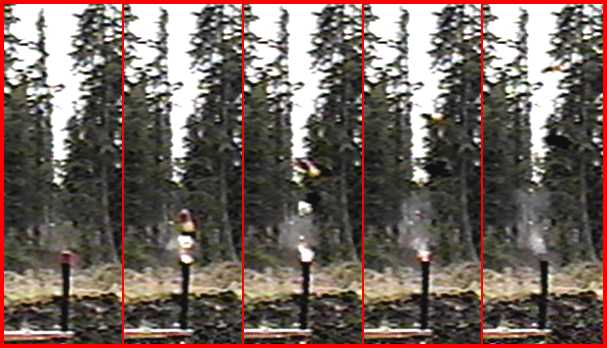
Armed with the baseline pressure readings for the standard BP charges, it was time to start trying out SP charges. First, one must eliminate the obvious so I made some charges of Bullseye, Red Dot, and Unique in standard BP-type packages. Naturally, they performed poorly and most of the powder was left unburned in the bottom of the test chamber. The best I could get with a bagged charge was 8 psi with 2 grains of Bullseye. Anything more than that didn't completely burn the powder and produced less pressure. Several charges were also fired outside the test chamber to see what they looked like as they went off. I set my video camera up with the shutter speed on 1/1000 and fired some BP and SP charges. The BP charges produced a blinding flash that completely blanked out about 3 frames of video. After that you have a large fireball and lots of sparks. It's no wonder that parachutes get so much burn damage from ejection charges. The SP charges basically just popped with very little fire, only a few short-lived sparks, and little smoke. At this point I'm wondering if we might get a two for one deal here and also eliminate some of the potential heat damage to the airframe and recovery system. As it turned out, that's exactly what happened. More later. Meanwhile, here are a couple sets of frame captures from the some of the video I took.
Note that the time reference per frame is the same for both images.
Time for Containment
I was hoping for an expendable means of containing SP charges that could be easily put together in the average, under equipped workshop. Unfortunately, I failed to find such an easy way (yet). I tried tape reinforced and doubled soda straws, small cardboard tubes, flexible plastic tubing, and tightly wrapped bags. But none of these field expedient methods worked. At the start of this project I had an idea. To simulate the conditions inside the chamber of a gun, we should make a holder that is modeled after the chamber of a gun. I had tossed around the idea of machining out some aluminum ejection wells even prior to the start of this project, so this gave me another excuse to do just that. It so happens that we did a large run of salmon dip net frames last summer at the shop. They used 5/8" 6061 aluminum round stock for the net frames and after bending each frame into its 3' x 4' shape there is a cut off operation that leaves one 4" and one 9" piece of scrap. So, a hundred of these scrap bars have been lying in a bucket all winter waiting for a use. I tossed one in the lathe and started cutting. The first one ended up pretty big. It was about 6" long with a 0.5" bore. This turned out to be too large for SP, since the volume of powder used is so small. A smaller bore is needed. After some trial and error, I found that a bore of about 1/4" to 5/16" seems to be the ideal size. I started limiting the size to about 2" long also, since this will have to be put into a cramped airframe tube. By machining the wall thickness down, I was able to get the weight down to under 4 grams. Not too bad at all.
The igniter end needs to be sealed, yet the igniter should be easily replaced. To accomplish this task, the hot glue gun came out. The head of the canister is drilled to accept the two-lead zip wire of the igniter. Since the igniter head is going to be the largest part, the igniter must be installed wires first from the opposite end of the canister and fed through. To get the igniter to stop at the right place, I put a small bead of hot glue around the wires right next to the head. This also provides the first level of sealing when this bead presses up against the tapered end of the canister (that taper is produced by the drill bit and was not an intentional part of the design). To retain the igniter, I bored the first part of the wire hole a bit larger so that it can be filled with hot glue. After use, a pair of pliers is used to pull the wire and this hot glue plug out. The small bead on the inside is pulled off the wire in this process and can be shaken out the other end of the tube. This method of sealing in the wire has worked very well. And it can be quickly removed for reloading. The only draw back I can see with this method is the requirement of a hot glue gun, which limits field loading. Here's a cross section of the design.
Now, how do we increase the pressure inside the canister so that the SP burns adequately? Creating the pressures found inside a firearm would be rather difficult without an elaborate capping system. The last thing we want to do is create a projectile (or bullet) that is going to be shot through your recovery system and nose cone. Bullet holes in the chute would definitely deduct style points. So, we're looking for an expendable and efficient means of increasing the pressure and allowing all the SP to burn (or at least ignite) before the pressure is released. Having the ejection canister long (like a gun barrel) was the first step in that direction. Next, we want as much powder as possible in contact with the igniter or very close to it. This is where the narrow bore size comes in. Using a rather long igniter head also helps here. The igniter should be as far forward as possible so that the SP charge is ignited from the front. The powder is kept in contact with the igniter by putting a piece of masking tape or one of those round stationary stickers in the canister with the sticky side out (toward the powder and the walls). The SP should not be compressed, but should just be held in place around the igniter. Later in the testing process, I found that a small ball of masking tape, sticky side out and about a caliber long, helped to increase the pressure and insure a full burn. Finally, but most importantly, we need a burst diaphragm on the end of the canister. The material that I have found to work best is latex rubber. I've salvaged this rubber from heavy duty balloons and high-risk medical gloves. To keep it on the canister, I left a small outer lip at the end when I was machining the tube. The rubber is placed over the end and secured in place with several wraps of a small rubber band. The diaphragm should be snug, but do not stretch it over the end of the tube, you want the expanding gasses inside to do all the stretching. Using multiple layers of rubber also increases the efficiency, especially if the material is on the thin side to start with.
Using this method, I was able to get ~5 grains
of Bullseye to give the same pressure readings as 15.4 grains of BP.
So, even though we are not getting the optimum efficiency found in a firearm,
we can still get SP to work about three times more efficiently than BP.
That means you could theoretically get over 1300 ejection charges (1 gm
BP equivalent) from a single can of Bullseye powder. Not bad.
Interestingly enough, the performance of Red Dot, Unique, and Win 231 were
all very similar to Bullseye. For all these powders it took about
5 grains to produce pressures similar to 1 gm of BP. In a low pressure
setting like this, small variations in the powder weight don't make a big
difference. In a firearm you can have drastic changes with a variance
of only 0.1 grain of powder. In this application (ejection charges),
it seems you have at least a 0.5 grain range before you start seeing significant
changes in the performance. Again, I fired a few charges in the open
with the video camera watching at its fastest shutter speed. On review,
I found that a rather long flame projects from the end of the tube, although
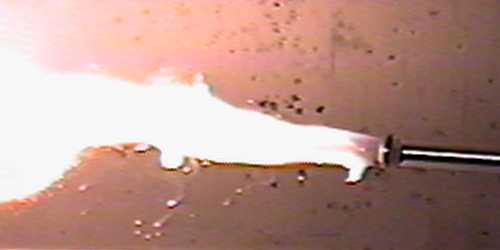
it is quite brief. It was now time to start popping off some nose
cones with some ground tests. Following is a picture of one such
test firing. The brightness of the flash again caused a couple frames
of video to be completely blanked out, so this frame is four frames after
the charge first broke through the diaphragm. Note that even though
this flame looks pretty hot, there are no significant flaming particles,
just pure fire. This flame burns out over the next three frames of
video. I haven't tried to set up a means of measuring temperature,
but I'm guessing that the temperature of this flame is cooler than those
produced by black powder. This flame will not even ignite a piece
of paper towel that is in direct contact.
(Note: All the dark spots in this picture
are marks on a metal plate behind the canister)
Try It Before You Fly It
For ground testing, I made another piece of equipment- a mock up airframe with a nose cone. I used a piece of 2.5" mailing tube and glued a wood plug in one end. I had a hole in this plug that was fit to a short piece of 1" PVC pipe, which I put in with epoxy. The other end of this pipe was threaded and I got a pipe cap to fit that, bored two holes in it to match two 16 awg wires, and sealed those in with hot glue on the outside and epoxy on the inside. Some alligator clips were soldered and insulated with heat shrink on the inside, while the outside was fitted with spade connectors to match my launch controller (similar to the plug used in the Pressure Test Chamber). I got a piece of 4x4 lumber and chucked it up in the lathe. It was turned down to give a 3" long shoulder to fit the mailing tube with an equal amount of 2.7" diameter on the forward end. This makeshift nose cone weighs in at about 8 ounces. If we can pop that heavy of a nose cone off, then a standard plastic or balsa cone shouldn't be a problem. To further simulate the contents of a rocket, I packed a large plastic trash bag (50 gallon size) into the tube. I put a single sheet of regular kitchen paper towel on the bottom so I could see the burn patterns produced by the ejection charges.
I started with a gram of BP, once again to get a baseline on performance. When I fired this first charge, the nose cone was launched about 30' into the air and the paper towel was floating down fully engulfed in flames. Too bad I didn't have the mock rocket secured very well, since the reaction force knocked my mounting loose and an aluminum tub I was using for a counter weight fell over and landed on the mail tube. A few wraps of duct tape and I had patched the hole in the tube caused by the aluminum tub and was back in business. I changed my mounting system from a counter weight to a few screws secured to a heavy wooden fish cleaning table. I loaded up the first 5-grain Bullseye charge with a new sheet of paper towel and the same trash bag. This one launched the nose cone a little more than half the height of the BP charge. The noise level was much quieter than the BP and it seemed to be less violent. The most impressive part was the fact that the paper towel showed only a few minute burn marks and did not catch fire. I went on to fire three more ejection charges composed of 5 grains of Bullseye. Two of the four gave equal performance to the BP, while the other two seemed to be a little less forceful, although they all completed the job. It's still unclear to me what the difference was between the charges. None of the Bullseye charges caused significant burn damage to the paper towels and the only damage to the plastic bag was from the original BP charge. I was rather impressed with the performance of the SP.
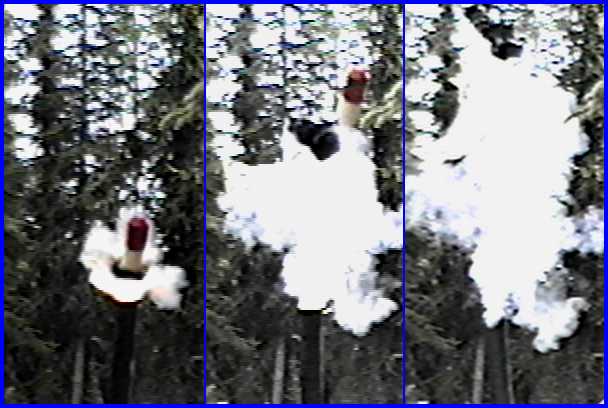
The following picture is a series of video frame captures showing a ground test. This particular charge is 4.7 grains of Bullseye in a canister with two layers of latex rubber from Hi-Risk medical gloves. These are five consecutive frames of video. The first shows the mock airframe prior to ignition. In the second frame you have the nose cone, plastic bag, and paper towel still moving together. The shoulder of the nose cone is painted yellow as a contrast to the red front so that its position and orientation could be easily seen in the video. At the end of the airframe you can see the ball of fire that the SP ejection charges produce. Note the space between the fireball and the paper towel and you can see why the paper towel doesn't get burned. In the next frame (middle one) you also have a good view of the flame and the drag on the plastic bag has started to slow it down while the nose cone continues to travel upward. The nose cone achieved an altitude of about 20 feet AGL prior to gravity taking over. I could probably set up a drag race between my nose cone and a MicroMaxx rocket and win easily. The fourth frame shows the flame starting to die down and the last frame has nothing but some smoke visible. The paper towel has separated from the plastic bag and the nose cone is visible about 1/4 of the way down from the top of the image.
Not only can a SP be used in place of BP, with
appropriate hardware, but it appears that SP's have a number of real advantages
over BP. Consider cost, availability, efficiency, lack of significant
heat or damaging particles, and you'll start to see the possibilities here.
It amazes me that no one has developed and published this technique before
now. I suppose that we were basically stuck in the tradition of fireworks
(the origin of our rocket motors) where BP is the only thing to use- no
matter what the job is you are trying to perform. I know there are
a few people using Pyrodex out there, and from what I hear the results
are less than perfect. This could also have something to do with
it. Someone tries Pyrodex and everyone else at the launch watch his
rocket come in ballistic and revert back to its component parts and raw
materials. They all agree that Pyrodex (read: any SP) is not a good
idea. It might be the fact that I take great care in assembling these
ejection charges combined with the fact that I've only fired a couple dozen
or so, but I haven't had a single SP charge fail yet. I've lit them
with everything from flashbulbs to Estes Solar to Copperheads to Igniterman
to Magnalite igniters. I've got some Davey Clone igniter heads on
order right now so that I can make up a batch of low voltage igniters for
flight testing of these ejection charges using a Magnetic Apogee Sensor
to fire them. I'll be using Firefox ELV primer on them with a final
coating of thin pyrogen. You can ignite BP with a single little spark,
but it seems that SP performs much better if you provide a lot of initial
fire to get it started.
Wrapping Up
This is only a rough draft of my full report on this subject. I thought it would be good to let those who have followed this project see some preliminary results. I'm still playing with different charges and different specifications of the ejection canisters. I'm also venturing into another field of metal working that I haven't played with before and that is the anodizing of aluminum. I think an anodized coating on these ejection canisters will help with clean up and give them a long life expectancy. Which brings up the point of cleaning. A standard gun cleaning kit does the job. Using a powder solvent along with the proper sized nylon bore brush cleans these canisters up quite well. A few times the hot glue was reluctant to pull out easily, but it scraped out with a small flat blade screwdriver ok. The first couple ejection canisters had an inner lip on the igniter end to hold the hot glue plug in place. I've found that to be completely unnecessary and have eliminated it from the design, although it still appears in the drawings posted above.
I didn't start this project with the intentions of making a product for sale. Since the ejection canister design I came up with requires some machine work to build, I realize that many rocketeers will not be able to build one themselves. Therefore, I will consider making some of these ejection canisters, after I get the anodizing process down, and make a few available for sale if the interest is out there. I have no desire to go into large scale production and I'm not even looking to make a profit. So if I do end up selling some of these canisters, they will go for the cost of time and materials to build them. A mass production run will go much faster than building them one at a time like I've been doing, so I would guess that the cost would end up around $20 each and perhaps less. I'll post notice when I get to the point where I would be willing to sell some of these canisters. I wouldn't expect it before the end of June.
As always, you may post comments about this project to RMR so that a large number of rocketeers may take part in the discussion. Or you may e-mail me at aleckson@alaska.net to share your comments, suggestions, or ask questions about this project. You can see the rest of my website by going to www.alaska.net/~aleckson/ and following the links. My rocketry stuff is in this section- www.alaska.net/~aleckson/rockets/ where I also have my Magnetic Apogee Sensor project (in need of some updates).
Thanks for stopping by and taking
the time to read this preliminary report.
Scott Aleckson, May 21, 2001
UPDATES
May 26th
Made a few grammatical corrections
throughout the document.
Added a few lines in several places
to clarify some points.
Added image of ejection charge
canister firing and a description.
Added image of ground test and
a description.
Since posting this report, I have received plenty of email messages about this project. There has also been some discussion on RMR about it (~28 posts to date). Although most of the messages have been simply expressing praise for my work here (and I truly appreciate that), there have been a few with suggestions about trying some different forms of containment. So, I have these ideas on deck for some testing: Putting the charge in a piece of surgical tubing with the ends sealed with a wire wrap (or similar method). The theory here is that the heavy wall surgical tubing will expand as the charge burns providing enough pressure to get a complete burn prior to the package rupturing. I'm going to give it a try as soon as I get my hands on some appropriate tubing. Another idea was presented on RMR of using fired cartridge brass casings as a CHAD ejection well. This idea was actually on my list near the beginning of this project and just hadn't been pursued yet. The thought is that you can remove the fired primer and drill out the flash hole to the size needed for your igniter wires. Then the igniter can be hot glued in place through the primer pocket in the same manner as the aluminum canister described earlier. I think it would be worthwhile to try this out on some small bore rifle brass such as .223 (7.62mm NATO) or similar. The reduced neck size should help increase the pressure inside to help get the powder burning. The only trick I see is getting a plug in there to hold the SP against the igniter. The idea of filling the rest of the case with an inert filler was suggested, so we'll give that a try as well.
Another idea was presented by a couple different individuals about using those .22 caliber blank cartridges from nail guns. I tossed that idea around at the beginning of this project also. After staring at a blank cartridge for awhile, I decided that this wasn't a feasible alternative. First, you would have to have a custom holder with insulated electrical contacts in appropriate places. Much harder to build than the ejection canisters outline above. Second, you'll have to have a high current power source to fire one of these. It would be easier to stick with the popular e-matches used these days, some of which can be fired with a single AA battery and all of them will work with a single 9v battery. This way we don't have to invest in new high current electronics to fire our charges. Third, you have little adjustment. The blanks come in a few different power levels, but they are still very limited. Finally, it's going to cost a lot more. These blanks are pretty pricey when compared to BP or SP, not to mention all the equipment you'll need to use them. I've tossed these .22 blanks into the worthless ideas scrap pile and I think they will stay there.
Just today there was a post about frontal ignition. I didn't really go into detail on this before, but that is exactly what we want to do. This depends a lot on the type of igniter used, but if the igniter is a single, small point of ignition, then it should be positioned so that the head is forward in the powder charge near the tape plug. I'll put together a few graphics representing different types of igniters to show the position relationship between the igniter and the powder. Because of both frontal ignition and the need to provide a rather high temperature ignition source (you should use igniters here that are capable of lighting AP motors), older ignition methods such as flashbulbs probably should not be used with SP. If you use plain nichrome or igniters that only have a primer-type coating, they should be covered with at least a thin layer of a good pyrogen such as those sold by Igniterman, Magnalite, or Firefox, just to name a few.
I ran a set of ground tests two days ago using a couple variations on the diaphragm setup. I setup some ejection canisters with the same 4.7 grain Bullseye powder charge and masking tape plugs. I did one with a single layer of rubber pulled tight. Another one had a single layer of rubber that was loosely covering the end. And a third one had two layers of rubber that were installed so that they were flat but not stretched over the end. The lowest performance was the single tight layer and the best performance was the two layer version. I think this may partially explain variations in the same charge from earlier experiments. I cut the pieces of rubber from different parts of molded products (balloons and gloves) so they don't always have the same thickness. It's also hard to install them with the same amount of stretch on every canister. Since the results of these differences in the rubber layer were so noticeable, I can see where minor variations in the material and the installation could cause noticeable differences in the performance of the charge.
Stay tuned! There is more
on the way.
A last minute contribution to
this page. This is a sequence from the firing of a Black Powder ejection
charge of 1 gram. There is so much pressure produced here in such
a rapid fashion that the smoke from the BP actually passes the plastic
bag once the nose cone clears the tube. Although not clearly visible
in these video captures, when playing the video frame by frame through
the TV, it is obvious that the paper towel I put in where you'd normally
have recovery wadding was on fire shortly after exiting the tube.
A few frames later, the towel could be seen in the edge of the frame floating
back down and fully engulfed in fire. You might also notice the change
in attitude of the airframe tube. As I mentioned earlier, I had the
mounting held down with a counter weight and the force was enough to knock
that over. The airframe and mount ended up on the ground where the
aluminum tub I was using to weigh it down landed right on the airframe.
Murphy's Law in action.