How I Created the Black Border
by Tony Rowlett
[ Home Page ]
 In responding to a question in the Original Q&A portion of
photo.net
about different types of borders in B&W photography,
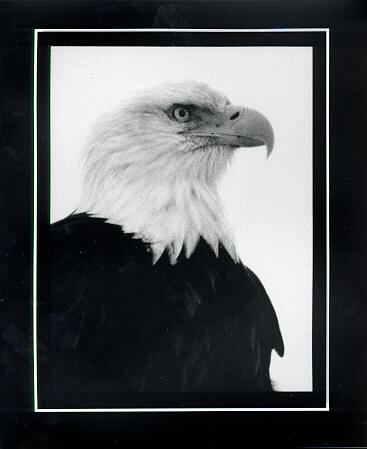
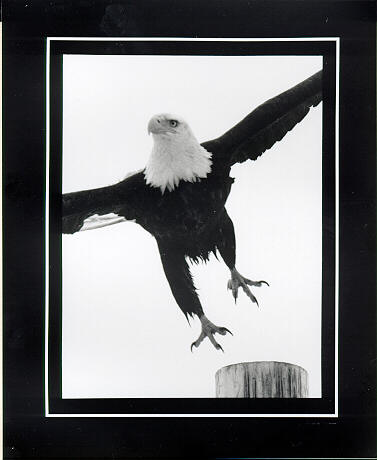
I included a link to a couple of Bald Eagle shots
that were shot by a friend of mine in Homer, Alaska and
printed by me using a nifty black border that
I learned about in
Black & White Photographic Printing Workshop
by Larry Bartlett with Jon Tarrant, Silver Pixel Press.
In responding to a question in the Original Q&A portion of
photo.net
about different types of borders in B&W photography,
I included a link to a couple of Bald Eagle shots
that were shot by a friend of mine in Homer, Alaska and
printed by me using a nifty black border that
I learned about in
Black & White Photographic Printing Workshop
by Larry Bartlett with Jon Tarrant, Silver Pixel Press.
After about five inquries through e-mail about the
border method, I decided to just post my instructions here.
This is just how I do it. There of course could be better
ways.
 The border with the white line involves using "Letraline" tape, an
opaque tape available at art supply stores (similar to what is used to
pin-stripe cars). It is available in many different widths and
patterns, but what you probably want to start with is about 1/16th inch
width. Use the tape to create a box frame onto a sheet of glass that
will correspond to the thin white line that will lay inside the thick
black border.
The border with the white line involves using "Letraline" tape, an
opaque tape available at art supply stores (similar to what is used to
pin-stripe cars). It is available in many different widths and
patterns, but what you probably want to start with is about 1/16th inch
width. Use the tape to create a box frame onto a sheet of glass that
will correspond to the thin white line that will lay inside the thick
black border.
Create another box frame inside the one you just created (smaller). This
will correspond to the inner edge of the thick black border and the
edge of the image area. We don't care what the outer limit of the thick
black border is because that will just run off the sides of your final
print.
Get an opaque card that covers the image area and about half of the line
of the inner box you made with the Letraline tape. This card will mask
off the area corresponding to the finished image, and it will use the
edges of the inner box (Letraline tape) to ensure absolutely straight
and smooth lines.
The hard part is over. Now, make a contact print with the sheet of
glass laying directly on top of a sheet of photo paper. Try grade 4 or
5 and 10 seconds at f/8 to start, but you want the minimum exposure that
will give solid black. Any more exposure, and the light will start to
bleed into the image area (and into the thin white line area). The
resulting print will show a large expanse of white with a thick black
border with a thin white line insie the border.
Now get a high contrast negative produced from your contact print. This
is so you can easily create the border image when you're in a real print
session with real images. A local pro lab will do that for for probably
$5. Once you have your border negative, you can get to business.
You need to repeat the whole process for different aspect ratios (5x7
and 8x10 are my two), but you can use the same one for different
enlargement sizes. When working with the border negative, print the
border first, then print your image. You'll have to plan your easel
settings, but it shouldn't be too involved.
Let me know if any of the above
was confusing; it's much easier to do
than it sounds. I had to read, and reread the paragraph in the book
quite a few times before I understood the process. Good luck!
Tony Rowlett