Tanking Down
When tanking down, be sure the water pumped into the fish hold is
full-strength seawater. Take water from the middle of a sound, away
from glacier and river runoff, if possible. If you must tank down in
harbor, do so towards the peak of the flood. Seawater that is diluted
with fresh water will freeze up the chiller before desired hold temperature
is reached. Adding freshwater ice to the fish hold before tanking down, to
"jump start" the system (so the system doesn't have to be run on the way out
to the grounds) reduces the salinity of the water and raises its freezing
temperature, making freezing-up more of a concern. Starting with ice is OK
for chilling round salmon, where we're trying for an optimum temperature that
ensures consistent product quality (we don't want to freeze eggs), but not for,
for example, blackcod, where we are trying for the lowest possible temperature
without freezing up the chiller.
Initial System Startup
If your unit is equipped with a compressor crankcase heater, the heater should be energized for several hours prior to starting the compressor. On some units the heater is energized when the control power circuit breaker is made. If the unit has been off for an extended period, energizing the heater overnight is good practice.
Before starting the unit, check oil level in the sight glass located on compressor base. You should be able to see an oil level. If you can't see a level it is sometimes difficult to tell if the crankcase oil level is low or is overfilled. Closer inspection with a focused-beam flashlight will help. Keep in mind that refrigeration oil is highly refined and under normal operation conditions is very pale yellow. If oil is not visible in the compressor sight glass, don't start the compressor until you can add more. Also check pressure gauges, paying particular attention to the suction pressure gauge. Some residual refrigerant pressure should read on the gauges. If they all read zero, the system refrigerant charge has leaked out. If the suction gauge reads zero, even though there is pressure reading on the discharge gauge, there might be a leak in the chiller. If in addition the indicator in the liquid line sight glass shows
"wet", it is time to call the serviceman. Running the system in this situation could compound a relatively simple repair job into a major one.
Make sure all refrigerant hand valves are open, including valves to control lines. Assure that the water in the tank is circulating through the chiller only (on bypass valves left open) and that the condenser pump is running raw seawater through the condenser. Switch the compressor on. If the compressor comes on, allow it to pump down the residual refrigerant left in the chiller before energizing the liquid line solenoid.
As soon as the compressor comes on, immediately check the oil pressure gauge. It should read significantly higher that the suction pressure gauge. If the oil pressure reading matches the suction pressure, there is no net oil pressure, and unit should be shut down immediately. Don't wait for the oil failure switch to do this, as it operates on a time delay.
Once the compressor has pumped down the system, it should shut itself off on the low pressure switch setting. This setting should never allow the compressor to pump into a vacuum; the suction gauge pressure at cutout should always be above zero.
Now, switch on the liquid line solenoid. The compressor should start when refrigerant pressure reaches the cut-in setting on the low pressure switch. After you have started the unit, you may see foaming in the compressor oil sight glass. This is normal as the suction pressure drops on startup. Once suction pressure stabilizes and temperature pull down begins, the oil level in the sight glass should be about half full. Note: on some compressor models the oil pump directs a stream of oil at the compressor sight glass.
top

Gauge Readings
The suction pressure gauge reading gives an indication of the chiller temperature. Pressures correspond to saturated temperatures, which may be thought of as the boiling point of the refrigerant. The pressure reading should correspond to a saturated temperature reading about 10 to 15 degrees colder than the circulating water temperature, depending on the peculiarities of your particular chiller. Often a saturated temperature scale is inscribed on the gauge face parallel to the pressure scale.
Compressor discharge pressure is controlled by the amount of raw seawater being pumped through the condenser. Decreasing condenser water flow, which decreases the heat exchange capacity of the condenser, increases the compressor discharge pressure. For most efficient operation, the discharge pressure should correspond to a saturated temperature of 85-95F. Once the system has been running a few minutes, adjust the condenser water by opening or closing the water control valve to obtain the optimum pressure. Adjust gradually, as it takes a few minutes for the pressure to stabilize. If you find the pressure remains undesirably high, the cause may be high seawater temperature (late summer out on the ocean), a condenser that needs to have sludge and scale rodded out, a condenser water pump that is restricted or worn, or non-condensables (air) in the lines with the refrigerant. If high side (discharge) pressure is undesirably low on startup, even with water flow through the condenser restricted or bypassed, then you might be short on refrigerant or you have no load on the chiller. Be sure the circulating pump is turning, and be sure water valves are all in correct positions so all the water is going through the chiller. If there is no load on the chiller the compressor suction line will frost heavily all the way to the compressor.
Don't forget the possibility a pressure gauge may be faulty, giving a inaccurate reading.
Discharge pressure will drop as suction pressure drops, as brine temperature is pulled down, so occasional adjustment of condenser water flow is desirable during temperature pull down to keep system operating at best efficiency. If the desired temperature pulldown isn't too great, as when starting with 45 degree єF water, some operators will set the discharge pressure a little high on startup and allow it to "float", and won't readjust it until desired temperature is reached just before fishing commences. On some systems discharge pressure is controlled by an automatic water valve that controls condenser water flow.
top
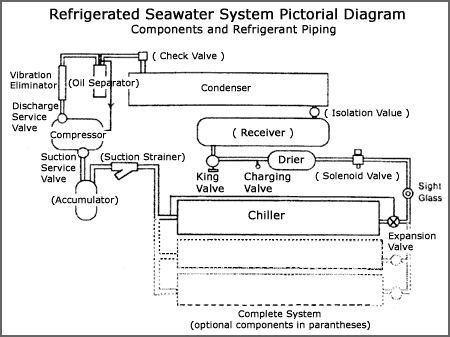
Once the condenser water has been adjusted to get the optimum compressor discharge pressure, look at the liquid line sight glass. At this setting, the glass should show a solid stream of refrigerant with no bubbles. The glass should be clear. Bubbles in the liquid line sight glass show the chiller isn't getting a full supply of refrigerant. The bubbles are not air, they are refrigerant vapor. This means the chiller isn't working at full efficiency, and suction pressure will be low. The cause might be discharge pressure too low, and tweaking the condenser discharge pressure a few pounds might clear up the sight glass. Or the cause may be a short refrigerant charge, in which case the leak needs to be found and fixes as soon as possible, before adding more refrigerant.
top
Freezeup and Refrigerant Floodback
Ts desired hold temperature is approached, the engineer should start checking the system more often. The compressor is a vapor pump, and if liquid refrigerant enters through the suction side, the compressor suction valves will be stressed and eventually will break. Most systems are equipped with a suction accumulator, which acts as a "slopover" tank to trap liquid refrigerant and allow it to boil off, helping prevent floodback. During refrigerant floodback conditions, such as when the chiller freezes up, the accumulator can fill completely and liquid refrigerant continues on to the compressor. A liquid level probe installed in the accumulator to signal an alarm condition is a recommended safeguard.
Floodback can be recognized by frost extending down the suction line all the way to the compressor and covering a portion of the compressor. The cause is generally freezeup, caused by low salinity in the tank, too low a thermostat setting, chillers clogged with debris, too many fish in the tank, or circulating pump failure. A pressure gauge to measure circulating pump water pressure on one side of the chiller or the other becomes useful as desired hold temperature is reached. A reading that starts to drop on the downstream side, or increase on the upstream side of the chiller, indicates the chiller is freezing up.
top
System Shutdown ("Pumpdown")
For compressor protection, this shutdown procedure should always be followed. The thermostat controlling the liquid line solenoid valve does this automatically. First, switch off the liquid line solenoid valve, or manually shut the king valve. The compressor will continue to run as suction pressure drops, until the compressor starter coil is de-energized by the low pressure cutout switch. The unit should never be allowed to pump into a vacuum (suction gauge reading below zero). When the compressor has been shut off by the control system, switch off compressor control power.
Operators who shut down their systems without pumping down the refrigerant are asking for floodback problems, including broken compressor valves, diluted crankcase oil, and a leaking compressor shaft seal.
Chillers should be back-flushed thoroughly each time the catch is unloaded to flush out debris and reduce bacteria levels in chiller.
top
Saturated Discharge Pressures and Temperatures
Sat Temp. / Corresponding gauge psi
| in єF | R22 | R404A | R507 | R717 |
| 75 | 130 | 163 | 168 | 125 |
| 85 | 155 | 190 | 195 | 153 |
| 95 | 185 | 220 | 225 | 180 |
Anytime the refrigerant seawater system isn't going to be used for several days, a few extra steps should be taken. For layup, if pumpdown is done by de-energizing a liquid line solenoid valve, the king valve must also be shut for a more positive seal. If there is an isolation valve between the condenser and receiver, this should be shut to isolate the charge in the receiver. The compressor suction service valve should be front seated to isolate the compressor from the chiller. If there is no discharge line check valve, the compressor discharge service valve should also be front seated. Be sure 1/4-inch flare service ports on service valves are securely capped before front seating service valves. In a well designed system, the seawater heat exchangers will drain by themselves when the system is shut down, so no standing water is left in the chiller or the condenser. If the chiller is not self-draining, plugs at the low spots should be removed. The shut-off valve in the condenser water line should be secured and the condenser end plate removed, and its zinc plate checked for action (shell and tube condenser). The end plate can them be bolted loosely into place, to be tighten next time the system is to be operated.
Pencil zincs screwed into water piping and chillers should be renewed regularly. If there is suddenly a notable rise in how quickly they dissolve, the cause is likely an increase in electrolytic action and its source should be located and corrective action taken as soon as possible.
top
|