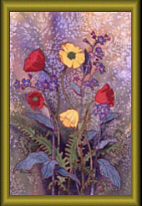
Alaska Poppies and Forget Me Nots
1. Transfer: Save the image, enlarge, and use as your pattern. Trace the pattern on tracing paper, then transfer onto watercolor paper.
2.
Color mixture:
Color mixture consistency is very important!
Try to imagine how these colors
might be if they were mixed to the consistencies
listed below, and do your
best to approximate them. The following code
numbers will be used in each
lesson online:
1 - Thicker, more
pigment, less water. Like heavy cream.
2 - Heavy midtone consistency, like "half
& half.
3 - Medium midtone, like milk.
4 - Light, with more water - like skim milk.
5 - "Blush" tone, with just a hint of
color and lots of water.
3. Masking: Before painting the background, mask the flowers, stems and leaves with art masking fluid and your rigger brush. Let it dry naturally. (To protect your rigger brush from being damaged by the masking fluid, be sure to coat it with a thin layer of soap suds before dipping into the maskoid and wash thoroughly after use.)
4. Background: Mix up the following paints, in separate puddles:
B. Sienna (2)
I. Yellow (2)
U. Blue + a bit of A. Crimson (2)
T. Green + a bit of B. Sienna (2)
Saturate the entire paper. Drain off excess water. Use the 1" flat brush to lay in the colors, one at a time, creating a multicolor wash. Refer to the photo for placement. Tip the paper to blend, and sparingly add salt when the paper begins to lose its wet shine. Wait 3-5 minutes for salt to work, then dry with a blow dryer. Brush off the salt.
To create more contrast for the dark/light background, mix up a puddle of
U. Blue + B. Sienna (2)
Lay this wash into the lower center area (leaves and stem area), blending the hard edge with water to soften. Dry the painting, and remove the masking agent with a maskoid remover or eraser.
5. Blossoms, Leaves and Stems: Paint the red poppy blossom. Use either your round or rigger brush.
Sunlit area: R. M. Genuine + Aureolin (3)
Shadow area: add A. Crimson to first mixture (3)
Paint the yellow poppy blossom.
Sunlit areas: Aureolin (4)
Shadow areas: I. Yellow (3) (Note: if your brand of I. Yellow is not dark enough, add a bit of B. Sienna to the mix to darken it)
Paint the poppy centers with;
T. Green + B. Sienna + Aureolin (3).
Paint the stems and leaves using the mixture below. Use your rigger brush. While the wash is still wet, use Artist Tool Tip #2 (or other scraping tool, like a bobby pin or opened-up paper clip) to scrape through the wash and make leaf "vein" lines. Dry.
T. Green + B. Sienna + Aureolin (3)
Where shadow is cast onto the stem, paint with the following mixture:
T. Green + B. Sienna (3)
Forget-Me-Nots:
Paint the flower buds with mixture below.
R.M. Genuine + C. Blue (more R.M. Genuine, for a pinker mix) (3)
Paint the open Forget-Me-Not petals:
Use two different mixtures for variety – (see color plate):
C. Blue (3)
C. Blue + R.M. Genuine (more blue) (3)
Paint the Forget-Me-Not centers.
I. Yellow (3) – while yellow is still damp, add a dot of undiluted A. Crimson in the center.
Paint the sunlit sides of the Forget-Me-Not stems and leaves. While the leaf wash is wet, create veins by scraping with Artist Tool Tip #2. Dry.
T. Green + A. Crimson + C. Blue (4), mixed to a blue-green.
Paint the undersides of leaves and the cast shadows:
T. Green + A. Crimson + C. Blue (3), mixed to a blue-green.
6. Finishing: To enhance the pattern and emphasize the graphic look of the painting, erase any tracing lines and outline the blossoms, stems and leaves with a fine tip red marker pen.
Click on picture to enlarge. 50k